
AI for construction site monitoring: A step-by-step guide for Autodesk users
Imerso is the world's most powerful AI system for tracking work progress and built quality effectively in construction projects, currently overseeing thousands of sites across the globe.
To deploy it, you must connect it to your projects Common Data Environment (CDE). This lets Imerso pull the performance targets for your project (ie. the BIM models and execution plans) to use in its monitoring, while also letting Imerso push its findings and alerts back to your CDE for your team to review and collaborate. As one of the world's most popular CDEs, Autodesk Construction Cloud is is a cloud-based space where information from construction projects is stored and accessible to project participants. With so many teams using ACC to manage their projects, this is a match made in heaven.
How to automate As-Built monitoring for Autodesk Construction Cloud:
- Activate the Imerso Integration to your ACC account
- Capture the As-built conditions at the site
- Analyse the current work status at the site
- Push results to ACC and share data with your teams
- Update BIM models to the As-built reality
- The Lean Construction process: Scan ➜ Check ➜ Share ➜ Repeat
Activate the Imerso Integration and sync your BIM models
The first step is to enable the connection between Imerso and your project's Autodesk Construction Cloud account. For this, you will need to have Admin level credentials in your Imerso account.
-
Log in to ACC and open the Account Admin Page.
-
Click on "Apps" and find Imerso on the app gallery list.
-
Click on the Imerso app, then click "Install" and "Authorize",
That's it! For BIM360 users, the process is similar.
Have a look at the clip bellow showing you the process for both ACC and BIM360:
This will send a request to your ACC account. Now log in to your Imerso account and open the Project Settings page. Scroll down to the Integrations section and find the ACC option. Click "Authorize" and "Allow". Then click the Add Integration button to setup the connection. Select your ACC hub and project and hit Save.
Imerso is now connected to your ACC account. 🚀🚀🚀
The only step left is to sync your BIM models in ACC with Imerso.
Follow the easy steps in this video:
And with that, you have now provided Imerso with the performance targets of what should be built at the site. Let's now capture the onsite reality, so we can next check if the Built matches the Planned.
Capture the onsite reality with 3D Scans: Self scanning vs External services
Many people are spooked at the mere mention of "Laser scanning" - Don't be. Gone are the days when only expert surveyors were able to play with this type of technology.
The Imerso system offers the most user-friendly solution for beginners. In fact, the majority of our users had never done a 3D scan in their lives before starting with Imerso, and are now capturing their sites on a weekly basis.
Approach 1 - Use your own onsite team to capture the site
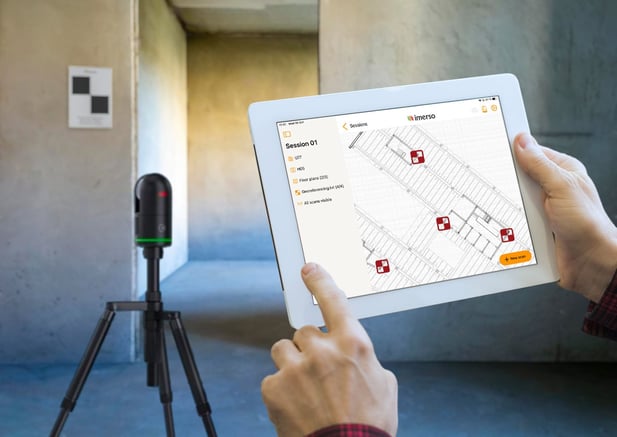
With Imerso, you can choose to designate any of your own team members to capture the As-built conditions of your site. This can be done by pairing a laser scanner with the Imerso Capture mobile app (best for beginners), or using the proprietary app of the scanner's manufacturer (for experienced surveyors).
Here's the main difference between those options:
- Beginners can simply install the Imerso Capture app on their iPad, and sync it to your project. Then follow the instructions on the app to connect with a BLK360 v1 or v2 laser scanner from Leica Geosystems. If your team has scanners from a different brand, see the next bullet point below. The Imerso app enables you to trigger scans with one button, without need for any preparation of the site with target markers or dealing with complicated coordinates processes. Simply tap, scan, and repeat. When uploading your captured scans to the cloud, the Imerso system will automatically register all scans together, while also place them in their correct location on the BIM.
- More experienced users, who prefer to geo-reference their scans and are familiar with setting coordinate targets at the site, can also do this trough the Imerso app, or use the scanner manufacturer's own app if they prefer. The Imerso app will load the data directly to the platform. The OEM app route requires that the scans are first processed in the manufacturer's software and then exported to a compatible format (ex. e.57) to be uploaded to Imerso.

Approach 2 - Hire a service to come capture the site
Alternatively, you can simply hire a third-party company to go onsite and capture the laser scans for you as a service. However, this approach has drawbacks:
- Expensive - Because of the premium price compared to the DIY option, this route typically leads projects to be scanned less often.
- Less Frequent - As result from the slower frequency, more issues are kept hidden to explode later as added costs and delays, which could otherwise have been detected and prevented earlier. This makes the choice even more expensive, all things considered.
- Less Agility - Your team will lose ability to simply go out and capture an area at the site at any time you wish. Rather, you must wait for the next scanning session, which may be weeks or months away. Or be ready to pay premium for any short-notice service without lead time.
- Work Interruptions - Because scanning will be a full-on event (better capture as much as possible in each precious session), the surveying tasks will require more coordination with the site teams to vacate and clean the areas, and make ready for the scanning, leading to wasted time and idle workers.
Using your own onsite teams to do the scanning resolves these drawbacks, which is why we heavily advocate that it's worth the effort of learning how to scan independently. Given how tools like Imerso now make it as easy as taking a photo, the case is a no-brainer.
![]()
Analyse the captured site status
Once your newest scans are uploaded to Imerso, the system is ready to check how your project is going. For this, you have several tools at your disposal:
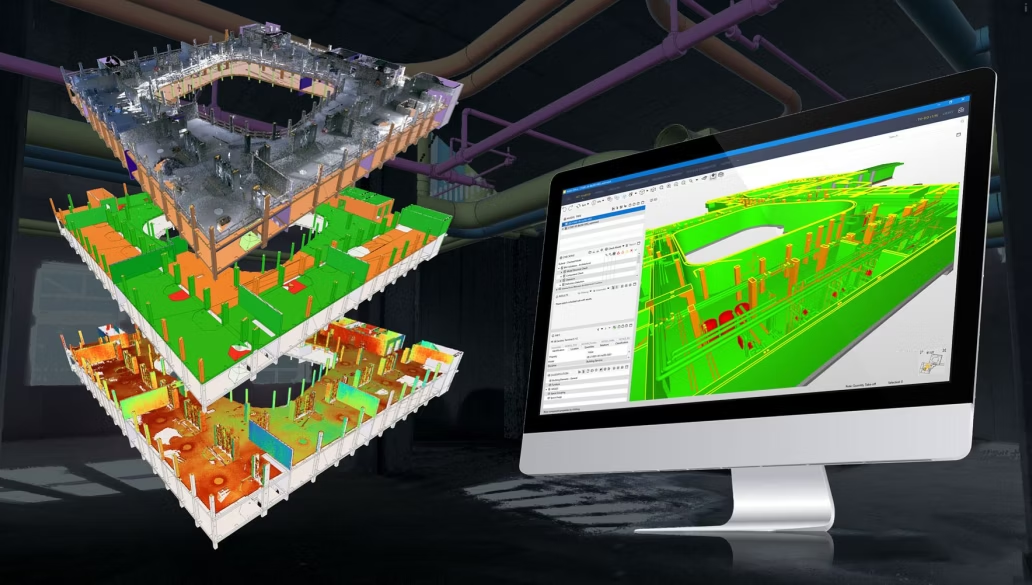
Visual checks with the Scan-Dev tool
The Imerso viewer lets your load your BIM models together with your latest scans, resulting in insightful Mixed Reality experiences. You can use this to enable remote teams to visit the site virtually, take measurements and cross-sections, write notes and take screenshots, and generally tour the current status remotely in context of the BIM plans without need for in-person visits.
 Taking a step further, the Scan-Dev tool is like getting X-Ray superpowers.
This tool gives you a colour-graded visualisation of your scans (ie- the As-Built status), split by the tolerance distance to the BIM objects. Simply put, objects in red are placed out-of-tolerance, while green ones are inside tolerance. You can change the tolerance value in real-time, according to the object class you are looking at.
Any problematic discrepancies are made immediately obvious to see, and can be instantly reported by flagging them an Issue. Each issue is enriched with detailed information and context, so your team can rapidly understand and find an optimal resolution.
 The Scan-Dev tool is a powerful approach that makes visible even the most detailed cases.
But what if you don't want to spend time touring the virtual site, looking to spot deviations?
Automatic reports with the BIM-Dev tool
You can use the BIM-Dev tool to get an automatic list of all deviations from BIM found in the latest set of site scans. The results will be group by BIM object into buckets, including Built Correct (objects found onsite within the specified tolerance), Misplaced (objects found onsite, but placed outside tolerance or built with wrong shape), and Missing (objects planned in BIM, but not found onsite). This approach generalises the detected issues into this type of wide category (which loses the granularity visible by the previous tool), but is much faster because it brings the issues to you. Ultimately, we recommend running both tools, so nothing escapes your radar.
With this tool, you can simply go through the list to review each result. You can either confirm the finding by reporting the case as an issue (the same as the previous tool), or dismiss the case as irrelevant so the system can learn over time.
 By reporting at the BIM object level, not only can you target inspections on specific object classes and disciplines, but you can also explore this for more advanced applications like Quantity Takeoffs and progress estimations. Ping us if you think this topic deserves a future post 😎
Check for upcoming clashes with the BIM-Clash tool
Ohhhh, but there's more. The previous tools give you stats on how the current built fares against what should be built today: ie the built objects against their respective specs.
How about looking into the future?
The BIM-Clash tool analyses the current built status against the plans for upcoming installations coming up in your execution schedule. You read that right. Simply put, Imerso lets you run clash detection of the built environment against the digital models, to continuously check if your plans still hold or if any team is heading for a collision.
As result, any detection is an opportunity to stop problems before they happen. 💣💥
 This tool is especially relevant in a pre-construction phase of a refurbishment project. You can rapidly capture the property and check if the early BIM reflects the onsite reality, and if the designs have no clash with permanent structures: vastly de-risking the project before the construction even starts.
Check surface levels and off-tolerance bends

Finally, you can use tools like the Surface Analyser to check for flatness and surface levels at your site. Reports that would otherwise require days of work from expert staff, are now available in seconds at the press of a button. You can use this to report cases like concrete slabs that are not curing properly and are bulging off-tolerance, or access ramps casted with the incorrect slope.
For anyone working in German-speaking Europe, you'll be happy to find an automatic mode set specifically for the rules of the strict DIN-18202 standard.

Push results to ACC and share data with your teams
For all the issue-cards flagged through the tools above, you can easily sync them with your Autodesk Construction Cloud environment, as we'll see in the next chapter. This will enable your team to collaborate and discuss the best solution for resolving each case.
To do this, navigate to the Issues page in Imerso using the left-side menu, and you'll find all the cases you've flagged during your inspection. Hit the Push to ACC button, and these will be synced with the CDE, recreated as tasks. Check out the video below to see this step.
Log in to your ACC account. All Imerso issues you pushed will be listed there, with all details and URL linking directly to the case in question in the Imerso 3D viewer. This lets you quickly bring up the issues in a presentation setting like a coordination meeting, and easily delegate tasks to the responsible teams.
Update BIM models to As-built reality
Not every issue will require onsite rework. Some misplacements, for example, are inconsequential and create little, or no negative impact on the work sequence or the project risk in general. However, rather than simply shove them into the drawer, never to be seen again, let's instead take the opportunity to update the BIM models with that site change.
In other words, making it a continuous effort to update the BIM models to the actual As-Built reality at the site, as the work progresses.
 This is one of the major differences in using technologies like Imerso. Traditionally, As-Built documentation is a necessary evil that nobody wants to deal with, and is practically seen as an annoyance. Quick and dirty methods take over, like photos and red-line drawings, just to get it over with. Trouble is that as result, the BIM models quickly become divorced from the built reality, as the work progress and untracked changes accumulate. Then you get the familiar last-minute rush at Handover, to document all changes and submit final As-built deliverables.
With Imerso, you can keep your models updated to As-Built with much less effort.
Automatically with the BIM-Fix tool and Revit
The fastest approach is to use the BIM-Fix tool: Imerso will move a displaced BIM object to its actual position in reality. By saving and exporting this .IFC, you can use it as a temporary placeholder in your authoring tools like Revit. Accept the change, and merge the results back to the federated model in Autodesk Construction Cloud.
Have a look at this video on how to use the BIM-Fix tool together with Revit:
Manually import 3D scans into Revit
Alternatively, you can simply export selected scans from Imerso, and load them into Revit to trace over and update your models. Simply open the Imerso 3D viewer, click on the scan orbs of any relevant scan, and hit Download. You can also export scans in bulk from the Scans page.
Chose the export format and scan density, and import the results to Revit.
COMING SOON: with Imerso's upcoming AI-driven scan segmentation, you will soon be able to select and export specific objects and trades captured in your scans. Stay tuned for more info on this feature and tell your friends. 😳
The Lean Construction process:
Scan ➜ Check ➜ Share ➜ Repeat
There you have it - the most effective way to eliminate costly risks and surprises from your ACC projects, while keeping your BIM models relevant for the upcoming lifecycle stages of the building. Grab your free copy of our Lean Construction Playbook here.
Repeat the steps above as often as needed, depending on the scope of your project. Most of our users are getting their sites checked on a weekly basis, in line with their weekly coordination meetings. Others book scan-inspections in a more ad-hoc routine, trailing the planned work schedules, with focus on the handover dates between teams or disciplines.
Whatever frequency your team lands on, just remember that the process above is meant as a repeating cycle, with a routine that must be made integral to project management. The more often you check the pulse of the project, the less time is given for issues to compound undetected, and the better coordinated your teams can be.

About Imerso
Imerso is a software platform that combines BIM, Reality Capture, and AI technologies to automate construction site supervision and quality inspections with one simple workflow. We help construction companies cut project risks and delay costs with real-time monitoring of site status and work quality.
How is Imerso different from photo & 360 camera solutions?
Photos and 360 Cameras are great ways to document the site status, but they only give visual data.
This is still valuable and Imerso is not meant to replace these approaches, but rather supplement their shortcomings. Leveraging 3D data instead of images, Imerso can evaluate the site status automatically, and alert users of deviations above the accepted threshold. This means users spend less time investigating the data, and more time analysing the inspection results.
You can find a detailed comparison of Imerso vs 360 Cameras in Construction here.